Gyrfalcon 1.1 User Guide
By Vivek Vaidya
1. Notes, Trees, and Clusters
Gyrfalcon organizes your notes by trees and clusters. Below is a snapshot that might make that a bit clearer.

In Gyrfalcon you can construct trees of notes, these trees can then be further organized into clusters of specific topics. The picture above has some possible cluster topics: contacts, todos, projects, etc but this is really only limited by your imagination. To add a new Note right click on an existing note, this will bring up a popup menu allowing you to perform various tree operations including adding a child or sibling note. To add a new cluster you can bring up the cluster popup menu by right clicking on one of the clusters or use the shortcut on the toolbar. You can move notes around in a tree by dragging and dropping them.
Hopefully you can already see how Gyrfalcon can help organize your information, but this is just the tip of the iceberg. The goal of Gyrfalcon is to provide a set of tools to help you organize and find the vast amount of information we end up dealing with in this modern world.
2. Sorting
In that spirit lets take a look at the quicksort feature in Gyrfalcon

First we have to bring up the tags tab (see figure above). This brings up information about the current selected note. Here we can see the date the note was created, the last time it was modified and its size in characters. A note can also have special tags associated with it, more on this in section 6. Now by clicking on the Date of creation button we can create a virtual cluster (see figure above). This will show all the notes in the entire workspace sorted by their date of creation. We could also create a virtual cluster of notes sorted by their last modification time, or their size by clicking on the respective buttons. While in this example this isn’t particularly useful when you get huge amounts of notes in Gyrfalcon it can be quite handy. For example: you could find out which notes you created last week, take a look at the notes you made last year, find out whats been recently modified, see what the really large notes are, or find out which notes have nothing in them (if your cleaning house).
3. Favorites
The favorites tab allows you to specify a few favorite notes and quickly access them(see picture below). Workspace favorites can be accessed from any cluster in the workspace and will automatically take you to the specific notes (don’t put too many of these in or you’ll run out of space, cluster favorites are specific to the cluster. You can add favorites by clicking on the toolbar shortcut while a note is selected. The remove favorites button brings up a dialog allowing you to remove favorites in case you run out of room and want to trim things down a bit. You might notice that there’s also folding menu for note specific favorites, we’ll get to that in section 5.

4. Using the toolbar
![]()
There are couple other useful features on the toolbar (see figure above): the back and forward arrows let you move back and forth through the history of previously visited notes, this functions just like a web browser. The disk icon will save (or just use [CTRL-S] ). The 'H' icon lets you highlight text, there is a color swatch to the left of it that allows to to select the highlight color. On the far right is a search bar, you can type in some text here, press enter and search through your notes for matching text (which will be underlined)
Intermission
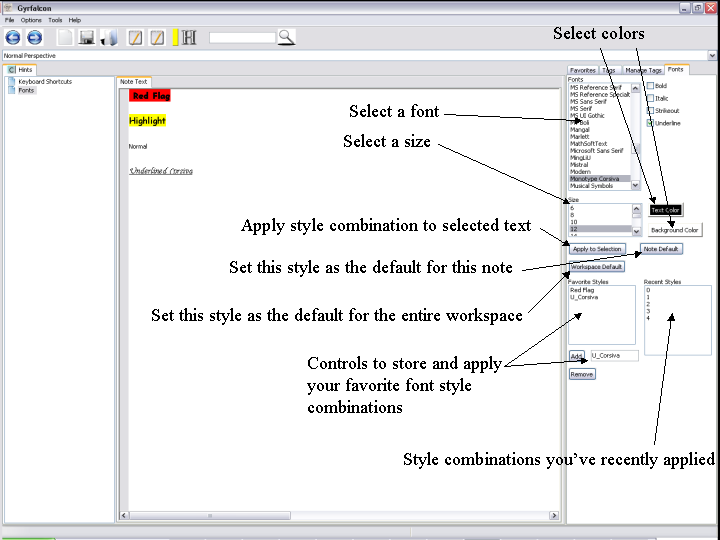
5. Fonts

New in 1.1 is the ability to changing the font styling. That is set the font, size, color, and things like bold/italic/underlines of your notes.
All of this can be controlled from the fonts panel, the image above describes the features offered here. This panel allows you to
create a style and then apply it to selected text, set it as a default, and store it for future use. For example: you might have a certain highlight
style you'd like to save and repeatedly use. You can do this by selecting the individual components (font, size, background color, bold/italic)
, enter a name for it in the text box just below the 'Favorite Styles' listing, then finally click on the add button. Now that style is added to the
listing and will be activated whenever you click on that element in the 'Favorite Styles' list.
6. Tagging
Gyrfalcon allows you to attach tags to notes. These tags can be simple textual items: like funny, TODO, and so on… or they can have a numeric value. Take a look at the two screenshots below, describing the manage tags sidebar and the tags sidebar. I have a cluster dedicated to quotes. I also have a numeric tag called Rating which can have a value from 0-5. Once I rate my quotes I can use the quicksort buttons we explored earlier to easily produce a list of all my quotes sorted by rating.. Or I could bring up a view of all my quotes that I have tagged ‘Dance’. Other possible uses are tags like Priority 1-10, or Difficulty 1-10 for tasks, allowing you to quickly find high priority or particularly challenging tasks. One nice thing about tags is it helps deal with situations when a note falls into multiple categories. For example, in the screens below we see a quote by Rabindranath Tagore on dance. Now should this be filed under quotes by Tagore, or quotes about dance? With just a tree this becomes a problem. But tags let us have our cake and eat it.


7. Options
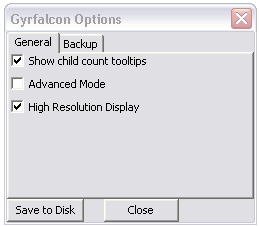
Below is a shot of the options dialog (accessible from the options menu), to use it check or uncheck an option then click the 'Save to Disk' button.
